Using and automating GitHub issues as blog comments
Practical guide in pure Javascript to replace Disqus blog comments using automated GitHub issues
When dealing with blog comments, I’ve been using Disqus for the last years but I was interested in giving GitHub issues a shot. Besides my blog is already completely freely hosted on GitHub Pages, therefore moving the comments to the platform would have been a nice addition.
I can’t say Disqus is a bad product. It just works™ and it’s easy to setup for anyone, even without any technical skill. But it doesn’t come without costs, which are slow loading times and user tracking.
You can read more about the former in Replacing Disqus with GitHub Comments, which is also the article that inspired me into trying GitHub comments, whereas The hidden price of using Disqus provides more details about the latter.
Pros & Cons
Pros
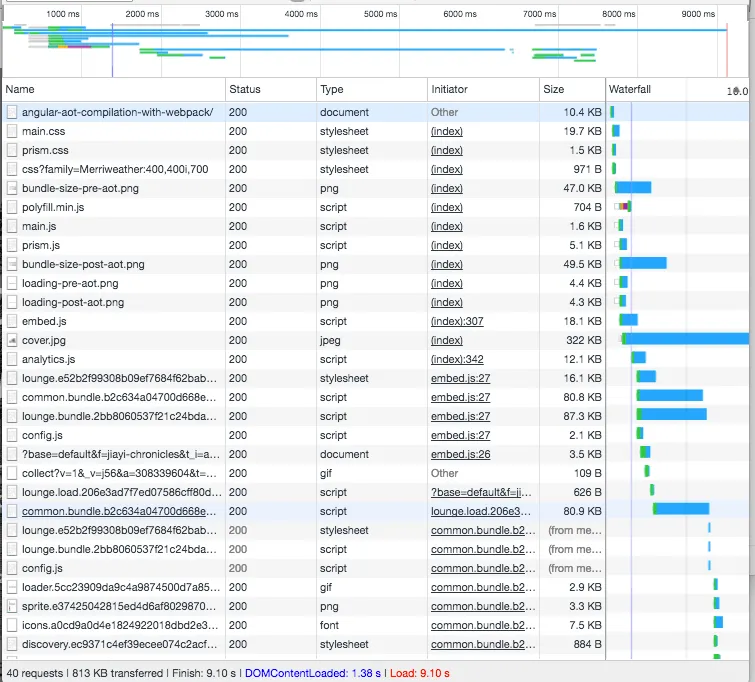
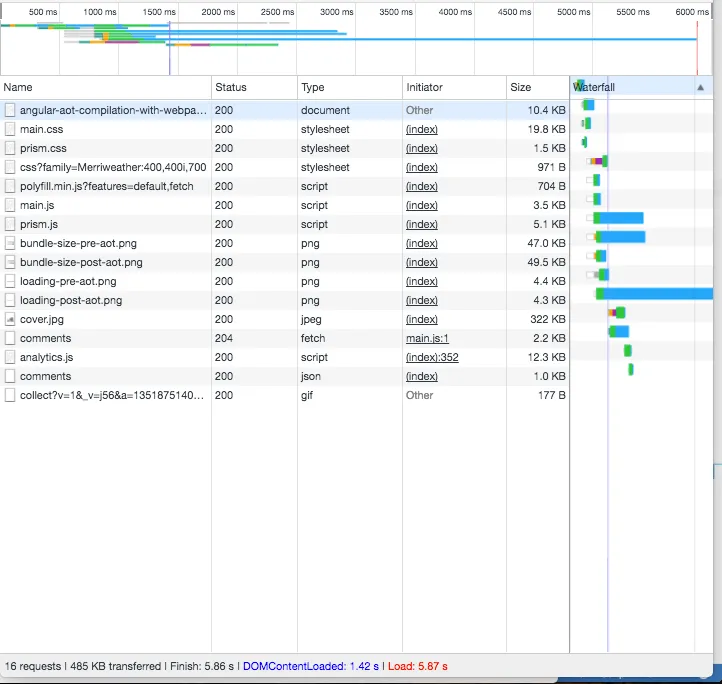
Without Disqus, the page loading time has improved by 35% and the size has been reduced of about 400KB. You can compare the following two network profiles, done with Chrome devtools and using a simulated regular 3G connection.


Beyond improved performance you also gain the following points:
- No reader tracking
- Comments can be written in Markdown
- Free protection from spamming, since a GitHub account is required
- (Hopefully) comments of higher quality from real GitHub profiles
- Reply notifications for blog authors and readers via GitHub, using the same platform we love
- Comment editing and deletion
- Complete control of comments appearance
Cons
Of course, this system is not suitable for anyone and have some important cons:
- More difficult setup
- Readers must have a GitHub account in order to comment
- Readers must leave the blog to comment on the GitHub issue
For the last point, you could register an OAuth application to post comments from your blog, but you’d still need to ask the authorization to your reader.
Setting up
The concept behind showing the comments in your blog is pretty simple:
-
Create a GitHub issue when you publish a new article, such as https://github.com/jiayihu/blog/issues/29
-
Users will comment on the issue related to an article
-
You get the comments JSON using GitHub API
-
You render them using plain Javascript, HTML and CSS
About the third point, you should create a GitHub Access Token to avoid hitting the rate limits. The only permission needed is public_repo, do not add more scopes because they’re not needed.
Without authentication, you won’t be allowed to make more than 60 requests per hour, whereas with a token the limit is increased up to 5000 requests per hour.
Then you only need to retrieve the JSON from GitHub and render the comments into the DOM.
The script
I based my script on the post Using GitHub to host blog comments: a working example, but it comes without dependencies and written in modern ES6 Javascript. Remember to transpile it to ES5 using Babel.
The complete script can be found on my blog repo at /src/js/modules/comments.js. Note that the strange CSS classes you’ll see are from Tachyons, used to build the UI with Atomic CSS.
function commentHTML(comment) {
  return `
    <li class="comment flex mt3">
      <div class="comment__body pa3">${comment.body_html}</div>
    </li>
  `;
}

function listHTML(comments) {
  return `
    <ul class="list pl0">
      ${comments.map(comment => commentHTML(comment)).join('')}
    </ul>
  `;
}

function noCommentsHTML() {
  return `
    <p class="f6 tc">Be the first to comment.<p>
  `;
}

function errorHTML() {
  return `
    <div class="flex items-center justify-center pa4 bg-washed-red near-black f6">
      <span class="lh-title ml3">Comments are not shown yet for this article.</span>
    </div>
  `;
}

function renderContent(content) {
  const container = document.querySelector('.comments-content');

  // Comments from Github API are already sanitized
  container.innerHTML = content;
}

export default function renderComments() {
  if (!window.ISSUE_ID) return renderContent(errorHTML());

  // ISSUE_ID is globally injected by the article template
  const API_URL = `https://api.github.com/repos/jiayihu/blog/issues/${window.ISSUE_ID}/comments`;
  // The token should be loaded from the build environment and not hardcoded
  const TOKEN = '123GitHubOAuthToken';

  fetch(API_URL, {
    headers: {
      Accept: 'application/vnd.github.v3.html+json',
      Authorization: `token ${TOKEN}`,
      'Content-Type': 'application/json',
    },
    mode: 'cors',
  })
    .then(response => {
      if (response.ok) return response.json();
      else return Promise.reject(response.statusText);
    })
    .then(comments => {
      if (!comments.length) {
        renderContent(noCommentsHTML());
        return;
      }

      renderContent(listHTML(comments));
    })
    .catch(error => {
      console.error(error);
      renderContent(errorHTML());
    });
}
The template
The template is also pretty straightforward. The value issueId can be added in the article Markdown, for instance using the YAML front matter if you have Jekyll. I use the same approach in Metalsmith, the static site generator of my blog.
---
title: Your article title
issueId: 1
pubDate: July 27th, 2017

---

Your article content.
The comments box template is the following instead:
<div class="comments measure-wide center">
  <script>var ISSUE_ID = '{{ issueId }}';</script>

  <h3>Comments</h3>

  {% if issueId %}
    <div class="br2 ba b--lightest-blue bg-washed-blue f6 mb5">
      <div class="flex items-center">
        <div class="fg1 pa3">
          <div>
            <p class="black-70 measure lh-copy mv0">
              This blog is using GitHub Issues as comments. You can post by replying to issue
              <a href="https://github.com/jiayihu/blog/issues/{{ issueId }}#new_comment_field"  class="link black f5 underline-hover" target="_blank">
                #{{ issueId }}
              </a>
            </p>
          </div>
        </div>
        <div class="w5 pa3">
          <a
            href="https://github.com/jiayihu/blog/issues/{{ issueId }}#new_comment_field"
            class="no-underline f6 tc db w-100 pv3 bg-animate bg-blue hover-bg-dark-blue white br2"
            target="_blank"
          >
            Post a comment
          </a>
        </div>
      </div>
    </div>
  {% endif %}

  <div class="comments-content"></div>
</div>
You can see the result at the bottom of this article. Nice, isn’t it?
Automate issue creation
An improvement of the previous setup is automating the creation of an issue every time you publish a new article. Basically, you won’t need to remember to do any manual work once you have set up the system.
The script is available on npm as gh-issues-for-comments and it will take care of opening the GitHub issues with a proper title, description and even labels. The issue for this article is an example of how mine is auto-generated.
The script will also create and update a file called gh-comments.json to keep track of the issues.
Feel free to read the source code, Pull Requests are welcome!
Lastly, if you are using Metalsmith like me, I’ve also published a plugin called metalsmith-gh-comments. It will run gh-issues-for-comments and add an issueId property to each article for layout usage.
I also suggest configuring the plugin only in the production phase, when you’re about to publish the article and less likely to change it:
const githubComments = require('metalsmith-gh-comments');

const IS_DEV = process.env.NODE_ENV !== 'production';

.use(
  IS_DEV
    ? () => {}
    : githubComments({
        username: 'jiayihu',
        repo: 'blog',
        token: '123GitHubOAuthToken',
      })
)
Conclusion
So far I’m satisfied with this setup. I don’t expect my blog to receive a huge number of comments and I write about tech topics, therefore the readers are likely to have a GitHub account.
A point of improvement would be the possibility of posting comments on the blog without leaving the page, but also without an OAuth application. The latter would require an authorization, such as when you sign up using Facebook or Twitter.
Let me know what are your thoughts.