Testing Observables in RxJS6
Introduction to RxJS marble testing, TestScheduler and how to improve Observable testing experience
With the release of RxJS6 there has been a great improvement of Observables testing and this article will guide you in the path of using RxJS marble syntax with the latest testing APIs.
In the second part, we’ll cover instead how to improve the testing developer-experience, especially if you’re not using Karma/Jasmine and you write your tests with something else like Jest, in my case, or Mocha/Tape/AVA.
Marble syntax
Marble diagrams are visual representations of an Observable flow to help you understand the flow of values and how an operator works. You see them everywhere in the RxJS documentation and they are very useful to convey the functioning of Observables.

If you’re not familiar with marble diagram, you can read more about them here.
So what about marble syntax? Well, put simply, it’s just an ASCII description of a marble diagram which can be used when writing about Observables.
The previous marble diagram of .map could be written as:
-1 ---2 ---3 ---|
  .map(x => x * 2)
-2 ---4 ---6 ---|
Every alphanumeric string is considered as an emitted value and hyphens '-' are units of time. To be precise:
' 'whitespace: horizontal whitespace is ignored and can be used to help vertically align multiple marble diagrams like we did to align the first stream of values'-'frame: a unit of time'|'complete: the successful completion of an observable'#'error: an error terminating the observable[a-z0-9]e.g. ‘a’ any alphanumeric character: represents a value being emitted()sync groupings: When multiple events need to be in the same frame synchronously, parentheses are used to group those events
Let’s take a step further: now the idea is using marble syntax to test Observables! Since streams are collections of async values, testing by subscribing and using classic assertions would be very difficult, counter-intuitive and unreadable. By instead taking advantage of marble syntax, we can write visually explicit tests about the flow of emitted and expected values from an Observable.
Testing Observables
In the next examples, we’ll use rx-polling as use case for writing Observable tests. rx-polling is a library which subscribes to a source$ Observable infinitely every N seconds and can be used with any Observable, although a polling service is usually a network request for updates (a poor man’s WebSocket).
Let’s see a base test for the library:
test('It should poll the source$ every interval', () => {
  scheduler.run(helpers => {
    const source$ = of(1); // Observable.of(1)
    const polling$ = polling(source$, { interval: 2 }).pipe(take(3));
    const expected = '1-1-(1|)';

    helpers.expectObservable(polling$).toBe(expected, { 1: 1 });
  });
});
The source$ Observable is just a stream of just 1, which can be rapresented as (1|). Note that the use of () is important because the stream emits 1 and it completes immediately on frame zero, whereas 1| would mean that it emits 1 at frame zero and it completes at first one.
A polling service would then take this Observable and repeat the subscription periodically. In this case, we are asking for a subscription every 2ms. 2ms would be too frequent for any real usage and usually, you would pass values like 1000/3000ms indeed, but here we are within a unit test and we have a different rapresentation of time. First, we don’t want to wait real time like 3 seconds and, second, a frame '-' equals 1ms when unit testing Observables. The marble syntax of the polling Observable would be then:
(1|)                                // source$
  polling(source$, { interval: 2 })
1-1-1-1-1-1-1-1-                    // and so on infinitely
  .pipe(take(3))
1-1-(1|)
As you can see, the final marble stream is exactly the one we declared as expected within the test. Now, what’s left is making an assertion about the result. The line
helpers.expectObservable(polling$).toBe(expected, { 1: 1 });serves this purpose. expectObservable takes an Observable as input and checks if the subscription matches the expected stream described by the marble syntax. We pass also a second parameter to .toBe because alphanumeric characters are interpreted as an emission of strings by default. By giving { 1: 1 } we are informing rxjs that the character ‘1’ corresponds to the literal number 1.
But where do helpers come from? And what is the wrapping scheduler.run? Okay, let’s talk about schedulers 😱
TestScheduler
In computing, a scheduler is a software which schedules/organizes a series of activities in a range of time. They are extremely important in different areas of Computer Science, like the process scheduler of the OS.
In RxJS, a Scheduler (the class) is used internally by the Observables to know when to start the execution and emit values. Especially within tests, they can be used to change the “meaning of time”, by making the Observables execute synchronously instead of asynchronously, without actually waiting time. We could, for example, decide that 500ms in real-world is just 50m or even 5 ticks of Node event loop.
By default, Observables use AsyncScheduler which is based on setInterval for timing, but we can replace it with TestScheduler in our tests. Put simply, the TestScheduler answers the question:
- “What a time frame ’-’ means actually?"
- "1 virtual millisecond”.
Let’s see a more complete version of the previous test and note how everything is imported from rxjs without further libraries:
import { Observable, of, timer, throwError, Observer } from 'rxjs';
import { take, map } from 'rxjs/operators';
import { TestScheduler } from 'rxjs/testing';
import polling from 'rx-polling';

/**
 * Simple deep equal assertion.
 */
function assertDeepEqual(actual, expected) {
  expect(actual).toEqual(expected);
}


describe('Basic behaviour', function() {
  let scheduler: TestScheduler;

  beforeEach(() => {
    scheduler = new TestScheduler(assertDeepEqual);
  });

  test('It should poll the source$ every interval', () => {
    scheduler.run(helpers => {
      const source$ = of(1);
      const polling$ = polling(source$, { interval: 2 }).pipe(take(3));
      const expected = '1-1-(1|)';

      helpers.expectObservable(polling$).toBe(expected, { 1: 1 });
    });
  });
});
Woah! So much more code! But actually, it just shows how to create a TestScheduler, by passing a function which makes an assertion about deep equality between the actual Observable stream and the expected one. We’ll go more deeply about it in the second part of the article. Then the instance of TestScheduler can be used as follows:
scheduler.run(helpers => {
  // ... some Observable testing
});
This code is similar to this.zone.run(...) of Angular NgZone, which executes all you async code inside a “zone” which can detect changes to your application. Likewise scheduler.run() executes your Observables within a special “zone” where the time is controlled by TestScheduler.
The first parameter helpers is instead passed by the scheduler and it has different methods:
cold(marbleDiagram: string, values?: object)- creates a “cold” observable by using a marble syntax. This method is useful if you cannot create Observables using the more common static methodsof/fromEvent/timer/intervaletc.expectObservable(actual: Observable<T>).toBe(marbleDiagram: string, values?: object)- schedules an assertion
Other methods are listed in the TestScheduler API documentation, including the ones for dealing with “hot” observables. If you don’t know the difference between hot & cold Observables, you can read more about the topic in “Hot vs Cold Observables”. For the sake of simplicity, we can say the cold observables are the most common ones, like Observable.of(1), whereas those involved in Subjects are hot, but they’re not used in this guide.
The following example tests about error recovery in rx-polling and helpers.cold is used to create an Observable which emits 2 values and then throws.
test('It should retry on error', () => {
  scheduler.run(helpers => {
    const source$ = helpers.cold('-1-2-#');
    const expected = '-1-2- ------ -1-2- ------ -(1|)';
    const polling$ = polling(source$, { interval: 6 }).pipe(take(5));

    helpers.expectObservable(polling$).toBe(expected);
  });
});
The expected result, in the previous snippet, waits for 6 frames before retrying. The same marble can be written more concisely using the new time progression syntax, by expressing it as 6ms surrounded by a space to avoid ambiguity with a series of emitted values:
const expected = '-1-2- 6ms -1-2- 6ms -(1|)';And that’s it! You should be able to finally test Observables in your application! This is just an introduction but we’ve covered a lot of concepts, so have a rest before reading the rest of the article and absolutely give it a try!
More information about TestScheduler and testing can be found in the official doc for Marble testing.
Second part: improving testing experience
TestMessage and Notification
Did you spend some time trying testing your Observables? When you start writing RxJS tests using marbles, you’ll start to see the following diff when tests fail:
    Object {
-     "frame": 11,
+     "frame": 9,
      "notification": Notification {
        "error": undefined,
        "hasValue": true,
        "kind": "N", // N -> value (next), E -> error, C -> completion
        "value": "1",
      },
    }
The object is an instance of TestMessage describing a frame of the Observable stream. Every frame in the marble syntax is interpreted as a TestMessage and, when the received stream doesn’t match the expected one, the test runner will throw a diff like the previous one.
Basically, it states “You expected 1 at frame 11, but actually the Observable emitted it at frame 9”. Converted back in marble syntax would be:
// For simplicity we use '-' for the frames preceding the one thrown
- ----------1
+ --------1
When you define your tests using marble syntax, the latter is trasformed into an array of TestMessage followed by a comparison between the received Observable TestMessage[] and the expected one. Unfortunately TestMessage[] is not converted back to marbles, so usually, the test runner diff can be daunting to read.
Marble matcher
A “matcher” is a test runner function used to test values in different ways. Jasmine/Jest have built-in matchers for primitive values, objects, arrays etc. with different visual outputs when the test fails.
We can then define our custom matcher for TestMessage[], which transforms them back into marbles. Fortunately, if you use Jasmine, you’re already covered with jasmine-marbles, whereas for other test runners you can use rxjs-marbles.
I have defined my own custom matcher a long time ago, when I first published rx-polling a year ago, but you can obtain a similar result using the former libraries:
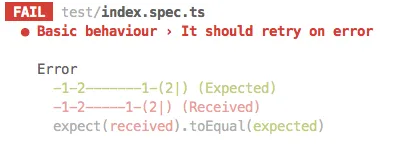
As you can see it’s much prettier than before!
Conclusion
It was a long journey, we have covered marble syntax and how to use it for Observable testing along with TestScheduler. We’ve also seen how marble syntax is converted to TestMessage[] by RxJS and how a test matcher can improve our testing experience.
I hope this guide cleared some misteries around RxJS testing and will make our application more solid! More examples of Observable tests can be found in the file rx-polling/test/index.spec.ts.