Angular AOT compilation with Webpack
Set up AOT compilation in Webpack to avoid runtime compilation, reduce bundle size and improve application start
Recently I’ve been dealing very often with Angular 2+ AOT compilation in Webpack and I’ve always found it an exhausting activity. The information is completely missing or extremely incomplete in the official Angular documentation, with no mentions about how to run it with a custom Webpack configuration.
Despite we’re almost at Angular 5, the AOT compilation is still very experimental in my opinion and it’s a journey of try & error, digging into Angular source code and GitHub issues until you succeed or give up.
Nevertheless, its benefits are often a requirement for your application.
In this article, I’ll share my experience about how to make the AOT compilation work with a custom Webpack configuration.
Disclaimer
This article won’t explain the details of what AOT compilation is or what it does technically. Also, the following parts assume you are using a custom Webpack configuration.
If you’re using standard angular-cli it will magically take care of AOT compilation for you and the command is ng build --prod. But you could still find the following information useful if you ejected the Webpack configuration or if you’re curious about how it works under the hood.
Webpack configuration
The first step towards successful AOT compilation is adding AOTPlugin to your Webpack configuration file, usually named webpack.config.js.
You can install the plugin from the package @ngtools/webpack, the official plugin from the Angular team and used under the hood in angular-cli.
The plugin uses ngc, the Angular AOT compiler, internally.
-
Import and instantiate
AOTPlugin. We’ll use this plugin only in production to generate the JS bundle distributed and actually used by the users.The plugin requires at least the path of the
tsconfig.jsonused in production and the path to theapp.modulefile, whereAppModuleis exported. The latter must be absolute, whereas the former can be relative.You can read the plugin README for the complete list of available options.
const AotPlugin = require('@ngtools/webpack').AotPlugin;

const prodPlugins = [
  new AotPlugin({
    tsConfigPath: 'tsconfig-prod.json',
    entryModule: path.resolve(__dirname, 'src/app/app.module#AppModule')
  }),
];

// The value 'production' depends on what NODE_ENV is set when running Webpack
// to compile the production bundle
const IS_DEV = process.env.NODE_ENV !== 'production';- Change
entrypath based on the environment. We’ll see in a while whatmain-prod.tsis:
// ...later in the config
entry: path.join(root.src, IS_DEV ? 'main.ts' : 'main-prod.ts'),- Change the Typescript loader based on the environment. We’ll use
@ngtools/webpackloader in production.
Note we’re including node_modules because the Angular compiler will use TS files located in node_modules. These files are called *.ngfactory.ts, the linked article provides a clear overview of their purpose.
{
  test: /\.tsx?$/,
  use: IS_DEV ? ['ts-loader', 'angular2-template-loader'] : '@ngtools/webpack',
  exclude: IS_DEV ? [/node_modules/] : []
}
The resulting change to webpack.config.js should look similar to the following diff:
const webpack = require('webpack');
+ const AotPlugin = require('@ngtools/webpack').AotPlugin;

+ const IS_DEV = process.env.NODE_ENV !== 'production';

const devPlugins = [
  // Your usual development plugins
];

const prodPlugins = [
+ new AotPlugin({
+   tsConfigPath: 'tsconfig.json',
+   entryModule: path.resolve(__dirname, 'examples/app/app.module#AppModule'),
+ }),
  new webpack.optimize.UglifyJsPlugin({
    sourceMap: false,
    output: { comments: false },
    compressor: {
      warnings: false
    }
  })
];

module.exports = {
  devtool: 'eval',
- entry: path.join(root.src, 'main.ts'),
+ entry: path.join(root.src, IS_DEV ? 'main.ts' : 'main-prod.ts'),
  output: {
    path: root.dest,
    publicPath: 'dist',
    filename: 'main.js'
  },
  module: {
    rules: [
      {
        test: /\.tsx?$/,
-       use: ['ts-loader', 'angular2-template-loader'],
+       use: IS_DEV ? ['ts-loader', 'angular2-template-loader'] : '@ngtools/webpack',
-       exclude: [/node_modules/]
+       exclude: IS_DEV ? [/node_modules/] : []
      },
      // ...other loaders like the following
      {
        test: /\.html$/,
        use: 'raw-loader',
        exclude: [/node_modules/]
      }
    ]
  },
  plugins: IS_DEV ? devPlugins : prodPlugins
};
tsconfig-prod.json
Now we’ll add the Angular compiler settings angularCompilerOptions to the Typescript configuration file used in production, named tsconfig-prod.json in this case.
The complete list of possible options can be found in the source code of the compiler.
{
  "compilerOptions": {
    "target": "es5",
    "module": "commonjs",
    "moduleResolution": "node",
    "sourceMap": false,
    "inlineSources": false,
    "emitDecoratorMetadata": true,
    "experimentalDecorators": true,
    "lib": [
      "es2015",
      "dom"
    ]
    "suppressImplicitAnyIndexErrors": true
  },
+  "angularCompilerOptions": {
+    "genDir": "aot", // Specify where Angular can create temporary AOT files
+    "skipMetadataEmit" : true // Don't generate not necessary metadata files. They are useful only if you're publishing an Angular UI library
+  }
}
main-prod.ts
Last step of the configuration: create a new file main-prod.ts, very similar to the usual main-prod.ts, where you bootstrap the application. The main differences are:
-
We’re importing
enableProdMode, which will disable development behaviours. For instance, the application won’t warn about “expression has changed” errors. -
We’re using
@angular/platform-browserinstead of@angular/platform-browser-dynamic. This will avoid including the JIT compiler (about 2MB uncompressed) in the final bundle and it will instead make use of the AOT compilation files, included by@ngtools/webpack.
import { enableProdMode } from '@angular/core';
import { platformBrowser } from '@angular/platform-browser';
import { AppModule } from './app.module';

enableProdMode();

const platform = platformBrowser();
platform.bootstrapModule(AppModule);
Make your code AOT ready
Now you’re finally ready to run the AOT compilation! 🎉 This is an example of the npm script in package.json, which can be ran using npm run build:
{
  "scripts": {
    "build": "cross-env NODE_ENV=production webpack"
  }
}
Actually… if you try the compilation you’re likely to run into a lot of scary red errors. That’s because you still have to make your Angular application code AOT ready.
Your code, especially your components, must follow some specific rules like not having private properties or methods in templates. You can find the list of rules here.
Important note: these rules must be followed by every piece of your application, even by external Angular libraries imported in your project. Otherwise, the compilation will throw.
The AOT compiler errors usually fall into 3 categories:
-
Code not AOT compatible, which don’t follow the previous rules
-
Typescript type checking fails. The AOT compilation will also throw if a template is using a property/method which doesn’t exist in the component class or if the types don’t match. This doesn’t happen with the JIT/runtime compilator.
-
Logic errors like dependency cycles.
As you can see the latter 2 categories are actually useful errors, whereas the first one is just a hassle.
Performance
After the compilation, you should see an improvement of the bundle size and a much faster bootstrap time.
Bundle size
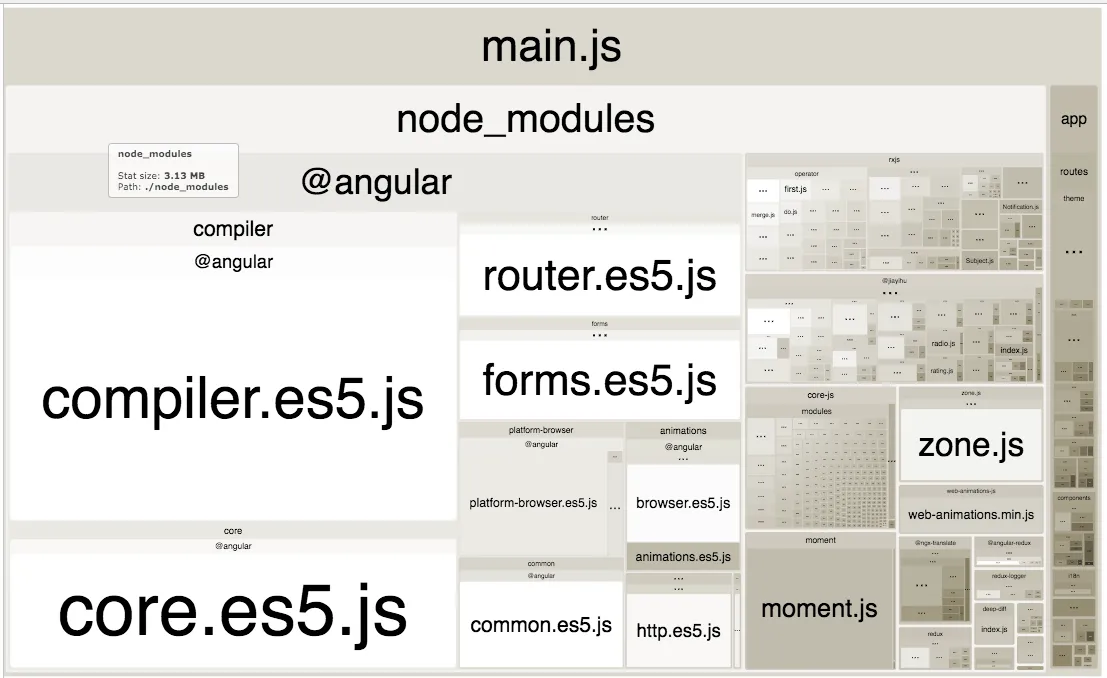
You can use webpack-bundle-analyzer to have a visual treemap of the bundle content.
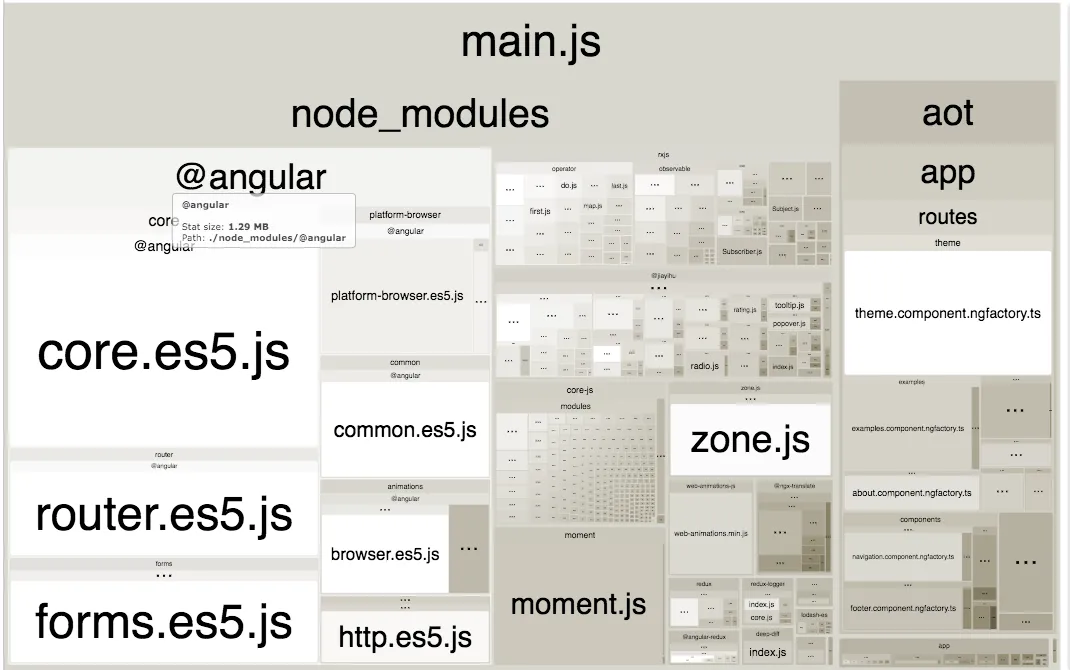
Before AOT compilation the @angular package had a size of 3.13MB uncompressed, whereas after the compilation it has been reduced to 1.29MB uncompressed. Still big, but surely better.
Pre-AOT (click to open):
Post-AOT (click to open):
Loading time
Another difference can be seen on the right side of the images. The AOT compiled application uses .ngfactory.ts files, produced by the AOT compiler, which replaces the HTML templates and avoids runtime compilation.
Thanks to those statically compiled files, the initial loading time has been reduced by about 70%.
Pre-AOT:
![]()
Post-AOT:
![]()
Final words
After the previous steps, you should finally have an AOT compiled application. The most difficult step is getting through all the compiler errors.
If you find cryptic errors I suggest searching for solutions in Angular issues, you’ll likely find someone else having the same issue. At least you won’t be alone in the dark.
Hopefully, this article will also help you see some light in the dark. Let me know in the comments.
Notes about versions
The versions assumed in this article are Angular 4, Webpack 2/3 and @ngtools/webpack@1.5.1.
Notes about UI library
So far we covered AOT compilation with an Angular application, in a next post we’ll see how to distribute AOT compatible UI libraries without Webpack and with unique requirements they must respect.
We’ll also use directly the ngc compiler and see how to make it work with Sass. Stay tuned.